Showing posts with label Tutorials. Show all posts

Wednesday, 30 January 2013

Cuggly Friends Softie Tutorial - Bunny


Want to make your very own Cuggly Friend Bunny?  Simply download the pattern template by clicking here, print it out on standard A4 paper (no page scaling), cut it out and then follow the steps below.  The file now downloads as a PDF so you will need Adobe to view it.

NB: This is a FREE tutorial for personal use only.  Please do not sell your finished products on any scale.  If you have any trouble downloading the template please comment on this blog with what browser you are using and I will sort out any issues.

REQUIREMENTS:

White fleece - 28cm x 19cm plus scrap for a tail
Printed cotton - 28cm x 19cm plus 8cm x 6cm for inner ears

Vliesofix (or alternative) 8cm x 6cm for inner ears plus scrap for attaching tail (optional)
Embroidery Thread - black and pink
Ribbon for neck bow (optional)
Red Prismacolor pencil (or alternative) - optional for 'rosy' cheeks
Air or water erase marker

STEP ONE: Preparation
Cut one body piece from fleece and one from the printed cotton.  Cut a round tail from fleece to a size as desired (mine is approximately 4cm diameter)
Following manufacturers instructions affix your Vliesofix (or alternative) to the back of the inner ears cotton.  TRACE around the inner ear template twice onto the paper side of the Vliesofix and cut them out.


STEP TWO:  Adding the Inner Ears and Tail

Remove the paper from the inner ear pieces and position on the fleece body where desired.  Following manufacturer's instructions iron the pieces into place.  Blanket, zig-zag or satin stitch around the edge of the inner ears.


Repeat for the tail by positioning the fleece tail where desired on the right side of the printed cotton body piece.


STEP THREE: Face embroidery

Carefully trace on the face embroidery as per template (or as desired, don't feel the need to do the same as me, have fun with your features!) with air or water erasable marker.  Satin stitch the two eyes in black embroidery thread (I use 3 strands) and the nose/mouth in pink. 


STEP FOUR: Sewing

Pin the front and back body pieces right sides together.  Starting at the inside of one leg sew around the body pieces using a small stitch and 1/4 inch seam allowance, remembering to back-stitch at beginning and end.  Stop sewing at the end of the second leg, leaving the area between the legs open for turning/stuffing (refer to photo below showing the area to leave open).   Carefully snip into corners and around curves avoiding snipping through the seam.  

HINT: I have shown two different turning gap options on the photo below.  Between the legs gives a nicer finish, but the outside of the leg allows for a bit more room for turning.


STEP FIVE: Turning & StuffingGently turn the bunny right side out through the turning gap, poking out arms, legs and ears.  Using small amounts of stuffing, gently stuff the bunny as desired, starting with the ears, head, arms, legs and finishing off stuffing the tummy section.  Using a ladder stitch close the turning/stuffing gap.

STEP SIX: Decorating

Tie a ribbon around the bunny's neck and put a little colour on the cheeks.


All finished!   Please feel free to share any photos of your Bunnies on my Facebook page here, or email them to me at littlesewandsews@hotmail.com and I will share them here on the blog.


Tuesday, 15 January 2013

2013: Sneak Peek of a new Little Sew & Sews range

2013 is going to be a massive year for Little Sew & Sews and I thought I would share a little taste of what is to come in the way of sewing patterns/tutorials.

Meet 'Bunny', the first of a new series of Little Sew & Sews softies called 'Cuggly Friends'.  'Bunny' will be available for FREE as a pattern/tutorial here on this blog within the next few weeks so stay tuned to my Facebook page for release details.   The Cuggly Friends range will have softies designed for beginner sewers through to more complicated designs for the 'not-so-beginner' sewers and tutorials for little extras for your Cuggly Friends will be available in the future too.


Wednesday, 3 October 2012

What's On at Little Sew & Sews!

Lots of exciting things are happening here at Little Sew & Sews HQ at the moment (pretty much all at once as usual!).

ORANGE OCTOBER Showcase at G.D.A.C 


WHEN: Starting Wednesday 10/10/12 at 8pm (Perth time) and finishing Friday 12/10/12 at 8pm.

 WHAT: Some very talented pages have come together to showcase the colour ORANGE, with a big array of gorgeous creations available to purchase.  Little Sew & Sews has included two entries - a Caped Cuddler/Ninja soft toy set and a size 2 One of a Kind retro Skirt & Applique' Tee set.


Find all the Orange October goodies here!  

ORANGE OCTOBER GIVEAWAY at Twist of Citrus


WHEN: Starting Wednesday 3/10/12 at 1pm Perth time and finishing 1pm Thursday 11/10/12

WHAT: A few businesses participating in Orange October have PRIZES up for grabs, including a custom order Caped Cuddler Superhero from Little Sew & Sews!

Head HERE for your chance to win!


Tickles the Bear Sewing Pattern available from Tickle the Imagination magazine


Available now - find it HERE starting from page 94/95.


If you are a beginner sewer ready to tackle a soft toy, then Tickles the Bear may be a great place to start and also repurpose a much loved baby blanket!  Instructions are available in the magazine and pattern pieces available to download from the Tickle the Imagination website HERE.  
NB: This Little Sew & Sews pattern is for personal/charity use only.  Little Sew & Sews retains all selling rights to finished products made from the Tickles the Bear sewing pattern.  If you would like a Tickles made for you from your own baby blanket please visit Little Sew & Sews here! or email me directly at littlesewandsews@hotmail.com

Little Sew & Sews 2012 CHRISTMAS COLLECTION


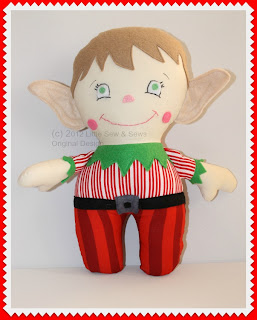
Sneak peek of the 2012 Christmas Collection Elf doll. He still needs a bit of tweaking and a hat (maybe boots too!) - stay tuned as he will be available for LIMITED orders very soon.


Perth Christmas Markets

Hopefully the next market for Little Sew & Sews will be Perth Upmarket on November 25.  Being a month before Christmas it is the PERFECT time to go shopping and Little Sew & Sews will have plenty of gift ideas for every budget!  This Christmas Little Sew & Sews will also have a limited edition range of Christmas dresses and skirt/tee sets in sizes 1-6 as well as a RAINBOWS & RIBBONS Collection.  Little Sew & Sews is going bright and cheerful this festive season!  Hope to see you all there!


Sunday, 19 August 2012

GIVEAWAY: Izzy Little Red Doll Soft Toy PDF Sewing Pattern


Meet the Little Sew & Sews Little Red Riding Hood doll - named Izzy after my friends' daughter, who wanted a Red Riding Hood cape for her Book Week costume :)  Not only am I making (and selling) the finished products, I have started writing up the pattern for other crafters to make this gorgeous doll!  The pieces have been sent off for testing and I hope to have the PDF Sewing pattern available for purchase towards the end of this week - keep an eye out on my Facebook page as I will post on there when it is finished and for sale.


GIVEAWAY TIME AGAIN!

If you would like to be the first lucky ducky to receive the completed Izzy Little Red Doll Soft Toy PDF Sewing pattern FREE, simply leave a comment below this blog post telling me the name of your favourite childhood storybook character - feel free to tell me why too!  You must also leave your full name and email address so that I can email the pattern through to the Giveaway winner.  Only one entry per person is permitted. 
 Comments will close on Wednesday 22 August, 2012 at 6pm Perth time.  GOOD LUCK!


Monday, 13 August 2012

GIVEAWAY TIME - The Superhero pattern is ALMOST here!

It is almost here! I am beyond excited to be releasing the first of my original design soft toy dolls as a PDF sewing pattern VERY SOON!  I am wary of giving an exact day and time that it will be ready, as every time in the past few weeks I have set myself a target date to have the photo tutorial completed, something goes awry (camera death, delays in receiving replacement, man & toddler flu just to name a few).   But ... it is almost finished, touch wood, AND after much deliberation the pattern will include both the boy and the girl versions (as opposed to doing two separate patterns).


GIVEAWAY TIME!

If you would like to be the first lucky ducky to receive the completed Superhero PDF Sewing pattern FREE, simply leave a comment below this blog post with what colour combination you will be using for your first Superhero.  You must also leave your full name and email address so that I can email the pattern through to the Giveaway winner.  Only one entry per person is permitted.
 Comments will close on Wednesday 15 August, 2012 at 6pm Perth time.  GOOD LUCK!

Friday, 29 June 2012

FREE TUTORIAL! Add-on a Softie Ruler to your Softie Tool Set!


TUTORIAL: Softie Ruler to add-on to your Softie Tool Set collection!


This little add-on has been bouncing around Little Sew & Sews HQ for just as long as the original set, and finally I have gotten to taking photos of all the steps to make a little Softie Ruler.  It is very quick and easy to make, you just need tape measure ribbon (I love the range over at Craft Queen) and scraps of wadding and cotton fabric.
Handy tip: Make sure you put the tape measure ribbon on the right way - it is upside down on mine - just to make sure, look at a real ruler while you are doing it!
Step One: Gather your materials

This is to make a finished product approximately 20cm long.  You can of course increase the length to whatever length ruler you like!

Step Two: Sew on the tape measure ribbon (the right way!) leaving a 1/4 inch gap to the bottom of the fabric


Step Three: Prepare materials for main construction, fold right sides together, place wadding on top and pin it down one length and one short end.


Step Four: Sew with a 1/4 inch seam allowance down one length and one short side, trim the corners of the sewn short ends being careful not to chop into the stitching.


Step Five: Turn right side out, poke the corners out gently


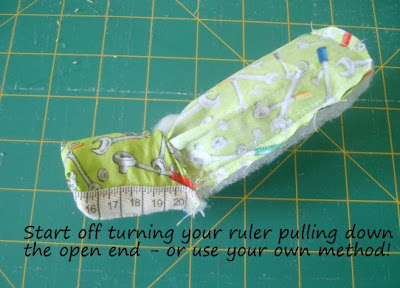
Step Six: Turn under the open end 1/4 inch and pin closed the opening. Handsew closed (or machine close if you prefer).  Give your ruler a quick iron, being careful to avoid any satin/polyester ribbons/labels and all finished!


COMING SOON: Another PDF Sewing Pattern to add on some MORE tools (yes more than one!) to  your collection! Stay tuned!

Where to buy the Softie Tool Set and Toddler Softie Handsaw PDF Sewing Patterns - http://littlesewandsews.bigcartel.com/category/pdf-sewing-patterns


Friday, 27 April 2012

Customer Creative Showcase #1: Softie Tool Sets


Towards the middle of 2011, I started to think more about what I wanted to happen in 2012 and beyond.  Having made the Softie Tool Set a signature Little Sew & Sews product, widely known through-out Australia, I decided what I would really like to do is see Softie Tool sets in the hands of babies, toddlers and fun loving parents ACROSS THE GLOBE!  I couldn't possibly achieve this monumental task by myself, and so was born the Softie Tool Set Sewing Pattern much earlier than I ever anticipated getting into the world of selling my patterns. The response has been awesome and incredibly overwhelming.   I would love to share with you, just a sample of the softie tool set creating that is already happening!  Keep sewing, keep loving and keep laughing as you try your hammers out on your husbands :D (What better way to test how much more stuffing you need?)

Softie Tool set - Jodie S
Softie Tool Set - Lyndall C
Forever Happy Set - Tina from The Sewing Fairy
Softie Tool Sets - Jodie from Zahley Rose
The first person to show me their finished set! Tracy G

Softie Tools made by Jo S.

Rockin Skulls Set - Tina from The Sewing Fairy
 If you have made products from my Softie Tool Set or Toddler Softie Handsaw Sewing Patterns and would like to be featured in my Customer Creative Showcase series, just post a photo on my Facebook page or email them through to me at littlesewandsews@hotmail.com.  If you are a business don't forget to include a link to where people can go to buy your creations too!


Wednesday, 25 April 2012

And the Winner is ...

The winner of the Toddler Softie Handsaw PDF Sewing Pattern giveaway is ... comment 29! 


Comment 29 belongs to Peta

"Ohhh Hi my name is Peta and I'm addicted to patterns :D  "

So am I Peta, so am I :)  Check your email as you have something from me awaiting you!

The Toddler Softie Handsaw PDF Sewing Pattern is now available to purchase from my website - with the first 20 purchasers getting it for a special price of only $5.

Sunday, 22 April 2012

GIVEAWAY TIME! - Toddler Softie Handsaw PDF Sewing Pattern

The pattern pieces are finalised, the fabric is chosen, the camera battery is charging and my computer desk is clear for a typing frenzy! - this all means that the Toddler Softie Handsaw PDF Sewing pattern is OH SEW CLOSE (like maybe only a few days away!)

If you would like to be the crafty lucky ducky that gets the first emailed version of the pattern for FREE, then simply comment below this blog post with your name and email address by Tuesday the 24th of April at 8pm PERTH time.  A comment will then be chosen at random as the winner - announced on this blog on Wednesday the 25th of April.


Stay tuned to my Facebook page as I will keep updating the progress on the pattern and other upcoming news!

Wednesday, 18 April 2012

TUTORIAL: How to make a double ended spanner with the Softie Tool Set Pattern

I love making my own soft tool sets with the double ended spanner - it gives extra bits for babies to chew on, grasp and for toddlers to have another end to 'fix things' with!  Here is how you can change the standard spanner pattern piece from the Little Sew & Sews Softie Tool Set sewing pattern into double-ended play-time fun!

First off, you need a ruler.  Take your spanner pattern piece and measure up from the bottom approximately 10cm and mark off a line on each edge of the pattern piece.  


Now it is time to trace as per the tutorial steps in your pattern BUT only trace from one line on the edge of the pattern piece around to the other one and stop.


To finish off the tracing of your double ended spanner, all you need to do is spin your pattern piece around, line up your lines with where you are up to and keep on going until you have a spanner with two ends.  HINT: It may be easier to make sure you straighten the lines up to make sure you have a nice smooth finish to the handle (the photo below shows how it would look otherwise).

Continue following the steps in the pattern to finish off your tools and voila! you have a softie tool set with a double ended spanner!


You can purchase the Softie Tool Set PDF Sewing Pattern from my bigcartel store (if you haven't already that is!): http://littlesewandsews.bigcartel.com/product/pdf-pattern-softie-tool-set-includes-photo-tutorial-electronic-file

Stay tuned, as by the end of April the Toddler Handsaw add-on PDF Pattern will be available for purchase!

**CALLOUT**
Have you made softie tool-sets from my pattern?  I am doing a pictorial showcase blog post next week of all the wonderful customer creations. I would love for lots of tool-set photos to come flooding in to me! Please email your low-res photo to me by Tuesday 24 April - littlesewandsews@hotmail.com - don't forget to include your name,state and website link if you have them for sale!


Tuesday, 13 March 2012

Little Sew & Sews Sewing Patterns/Tutorials Coming Soon!

A Little Bit of Excitement!

Little Sew & Sews first started over 2 years ago making Sewbots & 3 Piece Softie Tool-sets, and while the Sewbots have been in for a rather extended upgrade (sew many other things to do!), the 3 piece softie tool-sets remained as a firm favourite!  Do not despair!!, they will not be disappearing from the Little Sew & Sews product range any time soon, and while it also continues to evolve as a product, I thought it was time to share my love for the 3 piece softie tool-set with the rest of the sewing world!  So with some tweaking of my own product design I have made the pattern shapes perfectly sized and sewable for even the most beginner sewer and a PDF pattern with photo tutorial will be available very soon!  (and YES, you will be able to sell tool-sets made from my patterns on  your market stalls !!!!)

Give Away Time!

If you would like to be the very first crafter to get your hands on the 3 Piece Softie Tool-set pattern/tutorial PDF for free, before it is released for sale just leave a comment (with your name please!) on this blog post by midnight on the 20th of March, 2012.  A random winner will be drawn from the comments and announced on the blog on the 21st of March, 2012.