Showing posts with label Little Sew and Sews PDF Sewing Patterns. Show all posts

Monday, 17 June 2013

Time to turn 2013 around!


It has been a rather unsettling start to 2013 for my family and those we love dearly.  Battles with illness, lost loved ones, relationship breakdowns, school bullying, forced business closures and so much more sadness.  I have felt recently that there hasn't been much joy so far in 2013, so now it is time for it all to turn around!  I strongly believe that out of every sadness and every disappointment there is a way to make a positive, even if it is a small one in comparison.
One event this year has touched my family in a way I never want them to experience again, the loss of a son, a grand-son, a nephew, a cousin, and at only the age of 3 months old.  My dear friends lost their son Lachlan  as a result of Spinal Muscular Atrophy - SMA (find out more about SMA here: http://en.wikipedia.org/wiki/Spinal_muscular_atrophy and here: http://www.smaaustralia.org.au/ )
The first thoughts that came to my mind after hearing the news of Lachlan's diagnosis was " What is SMA?: and then "Why haven't I heard about it before if it is actually the most common genetic cause of death for infants?" and that is where I now choose to make a positive from such heartbreak.  Everyone that I know will now be aware of SMA and they may pass the knowledge onto their families and friends, who in turn pass it on further down the line.   Positive number 1: Creating Awareness.  This is not enough though, not for all those families that have lost their sons and daughters.  There needs to be help for those families, there needs to be testing widely available and discussed during early pregnancy and there needs to be funding for research programs.  Positive number 2: Fund-raising and more fundraising
Having raised over $1800 earlier in the year for the Spinal Muscular Atrophy Association of Australia through an on-line auction involving many generous businesses from across Australia, I intend to keep on raising more funds with the release of the Lachie Lion PDF Sewing Pattern through Little Sew & Sews.  Lachie the Lion has been designed in conjunction with Moogie&Me and will be a long-term fundraiser for SMA Australia.  Proceeds from the sale of the pattern and from Moogie&Me's Lachie Lion print will be donated to SMA Australia in a continued effort to raise awareness of SMA and funds for research and support programs.


You can find the Lachie Lion PDF Sewing Pattern available for purchase here: http://littlesewandsews.bigcartel.com/product/pdf-sewing-pattern-lachie-lion-plush-photo-tutorial-e-file-proceeds-to-sma-australia

If you would like to support SMA Australia by donating money, please consider donating through Lachlan's Legacy here: http://makingadifference.gofundraise.com.au/page/lachlanslegacy

If you don't sew but would love a Lachie Lion made for someone special, please email me at littlesewandsews@hotmail.com for further information

Wednesday, 30 January 2013

Cuggly Friends Softie Tutorial - Bunny


Want to make your very own Cuggly Friend Bunny?  Simply download the pattern template by clicking here, print it out on standard A4 paper (no page scaling), cut it out and then follow the steps below.  The file now downloads as a PDF so you will need Adobe to view it.

NB: This is a FREE tutorial for personal use only.  Please do not sell your finished products on any scale.  If you have any trouble downloading the template please comment on this blog with what browser you are using and I will sort out any issues.

REQUIREMENTS:

White fleece - 28cm x 19cm plus scrap for a tail
Printed cotton - 28cm x 19cm plus 8cm x 6cm for inner ears

Vliesofix (or alternative) 8cm x 6cm for inner ears plus scrap for attaching tail (optional)
Embroidery Thread - black and pink
Ribbon for neck bow (optional)
Red Prismacolor pencil (or alternative) - optional for 'rosy' cheeks
Air or water erase marker

STEP ONE: Preparation
Cut one body piece from fleece and one from the printed cotton.  Cut a round tail from fleece to a size as desired (mine is approximately 4cm diameter)
Following manufacturers instructions affix your Vliesofix (or alternative) to the back of the inner ears cotton.  TRACE around the inner ear template twice onto the paper side of the Vliesofix and cut them out.


STEP TWO:  Adding the Inner Ears and Tail

Remove the paper from the inner ear pieces and position on the fleece body where desired.  Following manufacturer's instructions iron the pieces into place.  Blanket, zig-zag or satin stitch around the edge of the inner ears.


Repeat for the tail by positioning the fleece tail where desired on the right side of the printed cotton body piece.


STEP THREE: Face embroidery

Carefully trace on the face embroidery as per template (or as desired, don't feel the need to do the same as me, have fun with your features!) with air or water erasable marker.  Satin stitch the two eyes in black embroidery thread (I use 3 strands) and the nose/mouth in pink. 


STEP FOUR: Sewing

Pin the front and back body pieces right sides together.  Starting at the inside of one leg sew around the body pieces using a small stitch and 1/4 inch seam allowance, remembering to back-stitch at beginning and end.  Stop sewing at the end of the second leg, leaving the area between the legs open for turning/stuffing (refer to photo below showing the area to leave open).   Carefully snip into corners and around curves avoiding snipping through the seam.  

HINT: I have shown two different turning gap options on the photo below.  Between the legs gives a nicer finish, but the outside of the leg allows for a bit more room for turning.


STEP FIVE: Turning & StuffingGently turn the bunny right side out through the turning gap, poking out arms, legs and ears.  Using small amounts of stuffing, gently stuff the bunny as desired, starting with the ears, head, arms, legs and finishing off stuffing the tummy section.  Using a ladder stitch close the turning/stuffing gap.

STEP SIX: Decorating

Tie a ribbon around the bunny's neck and put a little colour on the cheeks.


All finished!   Please feel free to share any photos of your Bunnies on my Facebook page here, or email them to me at littlesewandsews@hotmail.com and I will share them here on the blog.


Tuesday, 15 January 2013

2013: Sneak Peek of a new Little Sew & Sews range

2013 is going to be a massive year for Little Sew & Sews and I thought I would share a little taste of what is to come in the way of sewing patterns/tutorials.

Meet 'Bunny', the first of a new series of Little Sew & Sews softies called 'Cuggly Friends'.  'Bunny' will be available for FREE as a pattern/tutorial here on this blog within the next few weeks so stay tuned to my Facebook page for release details.   The Cuggly Friends range will have softies designed for beginner sewers through to more complicated designs for the 'not-so-beginner' sewers and tutorials for little extras for your Cuggly Friends will be available in the future too.


Sunday, 16 September 2012

Customer Creative Showcase Part 2: Tool Sets, Superheroes & Little Red


I love seeing everyone's creations using my Little Sew & Sews Sewing Patterns! Here is a selection from some very talented ladies that have taken the time to share some photos with me via email or on my Facebook page. 

My Obsession Designs ensures the girls won't miss out with her spotty pink Softie Tool Set

Izzy Little Red Doll from Zahley Rose

Zahley Rose has been very busy making Softie Tool Sets!

Superhero AND Softie Tool Sets at Perigren Creations (as well as some of her  yummy felty food goodies!)
MORE Superheroes available from Perigren Creations

Extra Cute (& unisex!) Safari Softie Tool Set (All 4 Noah)

Softie Tool Sets for the busy boys with Tool Belt from (All 4 Noah) 


If you would like to be a part of the next Customer Creative Showcase featuring products you have made from the Little Sew & Sews range of sewing patterns, please email me at littlesewandsews@hotmail.com

Little Sew & Sews PDF Sewing Patterns (and custom made finished products) can be purchased here: www.littlesewandsews.com.au
Patterns currently available are: Softie Tool Sets, Toddler Softie Handsaw, Superhero Soft Toy Doll & Izzy Little Red Soft Toy Doll.  Stay tuned as more patterns will be released in October, 2012!

Sunday, 19 August 2012

GIVEAWAY: Izzy Little Red Doll Soft Toy PDF Sewing Pattern


Meet the Little Sew & Sews Little Red Riding Hood doll - named Izzy after my friends' daughter, who wanted a Red Riding Hood cape for her Book Week costume :)  Not only am I making (and selling) the finished products, I have started writing up the pattern for other crafters to make this gorgeous doll!  The pieces have been sent off for testing and I hope to have the PDF Sewing pattern available for purchase towards the end of this week - keep an eye out on my Facebook page as I will post on there when it is finished and for sale.


GIVEAWAY TIME AGAIN!

If you would like to be the first lucky ducky to receive the completed Izzy Little Red Doll Soft Toy PDF Sewing pattern FREE, simply leave a comment below this blog post telling me the name of your favourite childhood storybook character - feel free to tell me why too!  You must also leave your full name and email address so that I can email the pattern through to the Giveaway winner.  Only one entry per person is permitted. 
 Comments will close on Wednesday 22 August, 2012 at 6pm Perth time.  GOOD LUCK!


Monday, 13 August 2012

GIVEAWAY TIME - The Superhero pattern is ALMOST here!

It is almost here! I am beyond excited to be releasing the first of my original design soft toy dolls as a PDF sewing pattern VERY SOON!  I am wary of giving an exact day and time that it will be ready, as every time in the past few weeks I have set myself a target date to have the photo tutorial completed, something goes awry (camera death, delays in receiving replacement, man & toddler flu just to name a few).   But ... it is almost finished, touch wood, AND after much deliberation the pattern will include both the boy and the girl versions (as opposed to doing two separate patterns).


GIVEAWAY TIME!

If you would like to be the first lucky ducky to receive the completed Superhero PDF Sewing pattern FREE, simply leave a comment below this blog post with what colour combination you will be using for your first Superhero.  You must also leave your full name and email address so that I can email the pattern through to the Giveaway winner.  Only one entry per person is permitted.
 Comments will close on Wednesday 15 August, 2012 at 6pm Perth time.  GOOD LUCK!

Friday, 29 June 2012

FREE TUTORIAL! Add-on a Softie Ruler to your Softie Tool Set!


TUTORIAL: Softie Ruler to add-on to your Softie Tool Set collection!


This little add-on has been bouncing around Little Sew & Sews HQ for just as long as the original set, and finally I have gotten to taking photos of all the steps to make a little Softie Ruler.  It is very quick and easy to make, you just need tape measure ribbon (I love the range over at Craft Queen) and scraps of wadding and cotton fabric.
Handy tip: Make sure you put the tape measure ribbon on the right way - it is upside down on mine - just to make sure, look at a real ruler while you are doing it!
Step One: Gather your materials

This is to make a finished product approximately 20cm long.  You can of course increase the length to whatever length ruler you like!

Step Two: Sew on the tape measure ribbon (the right way!) leaving a 1/4 inch gap to the bottom of the fabric


Step Three: Prepare materials for main construction, fold right sides together, place wadding on top and pin it down one length and one short end.


Step Four: Sew with a 1/4 inch seam allowance down one length and one short side, trim the corners of the sewn short ends being careful not to chop into the stitching.


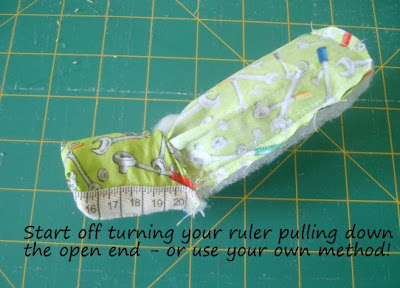
Step Five: Turn right side out, poke the corners out gently


Step Six: Turn under the open end 1/4 inch and pin closed the opening. Handsew closed (or machine close if you prefer).  Give your ruler a quick iron, being careful to avoid any satin/polyester ribbons/labels and all finished!


COMING SOON: Another PDF Sewing Pattern to add on some MORE tools (yes more than one!) to  your collection! Stay tuned!

Where to buy the Softie Tool Set and Toddler Softie Handsaw PDF Sewing Patterns - http://littlesewandsews.bigcartel.com/category/pdf-sewing-patterns


Sunday, 22 April 2012

GIVEAWAY TIME! - Toddler Softie Handsaw PDF Sewing Pattern

The pattern pieces are finalised, the fabric is chosen, the camera battery is charging and my computer desk is clear for a typing frenzy! - this all means that the Toddler Softie Handsaw PDF Sewing pattern is OH SEW CLOSE (like maybe only a few days away!)

If you would like to be the crafty lucky ducky that gets the first emailed version of the pattern for FREE, then simply comment below this blog post with your name and email address by Tuesday the 24th of April at 8pm PERTH time.  A comment will then be chosen at random as the winner - announced on this blog on Wednesday the 25th of April.


Stay tuned to my Facebook page as I will keep updating the progress on the pattern and other upcoming news!